---
title: "Opensense admin introduction (classic UI)"
slug: "opensense-admin-intro"
description: "A classic-UI tour for new Opensense admins: naming rules, Designer Studio templates, images and links, departments, signature routes, and admin roles."
updated: 2024-01-13T23:20:35.000Z
canonical: "https://help.opensense.com/docs/opensense-admin-intro"
---
> ## Documentation Index
> Fetch the complete documentation index at: https://help.opensense.com/llms.txt
> Use this file to discover all available pages before exploring further.
# Opensense admin introduction (classic UI)
:::note[Classic UI]
This article covers the classic Opensense UI. In the New UI, see [Introduction to Designer Studio](https://help.opensense.com/docs/introduction-to-designer-studio) for signature templates. User groups are under **Manage** > **Groups**, signature assignment is under **Signatures** > **Routing**, and roles are set on each user's **Settings** tab: see [How do I update permissions for the Opensense platform?](https://help.opensense.com/docs/how-do-i-update-permissions-for-the-opensense-platform).
:::
## Naming conventions and syntax
Opensense uses one naming convention across the platform. Follow it for templates, fields, banners, and tags:
Allowed
- Lowercase letters
- Numbers
- Underscores
Not allowed
- Uppercase letters
- Special characters
- Spaces
To copy names into a signature, use this syntax:
- Banner names
[[ad:bannername]]- Tag names
[[adtags:tagname]]
## Designer Studio: creating and editing signature designs
### Accessing Designer Studio
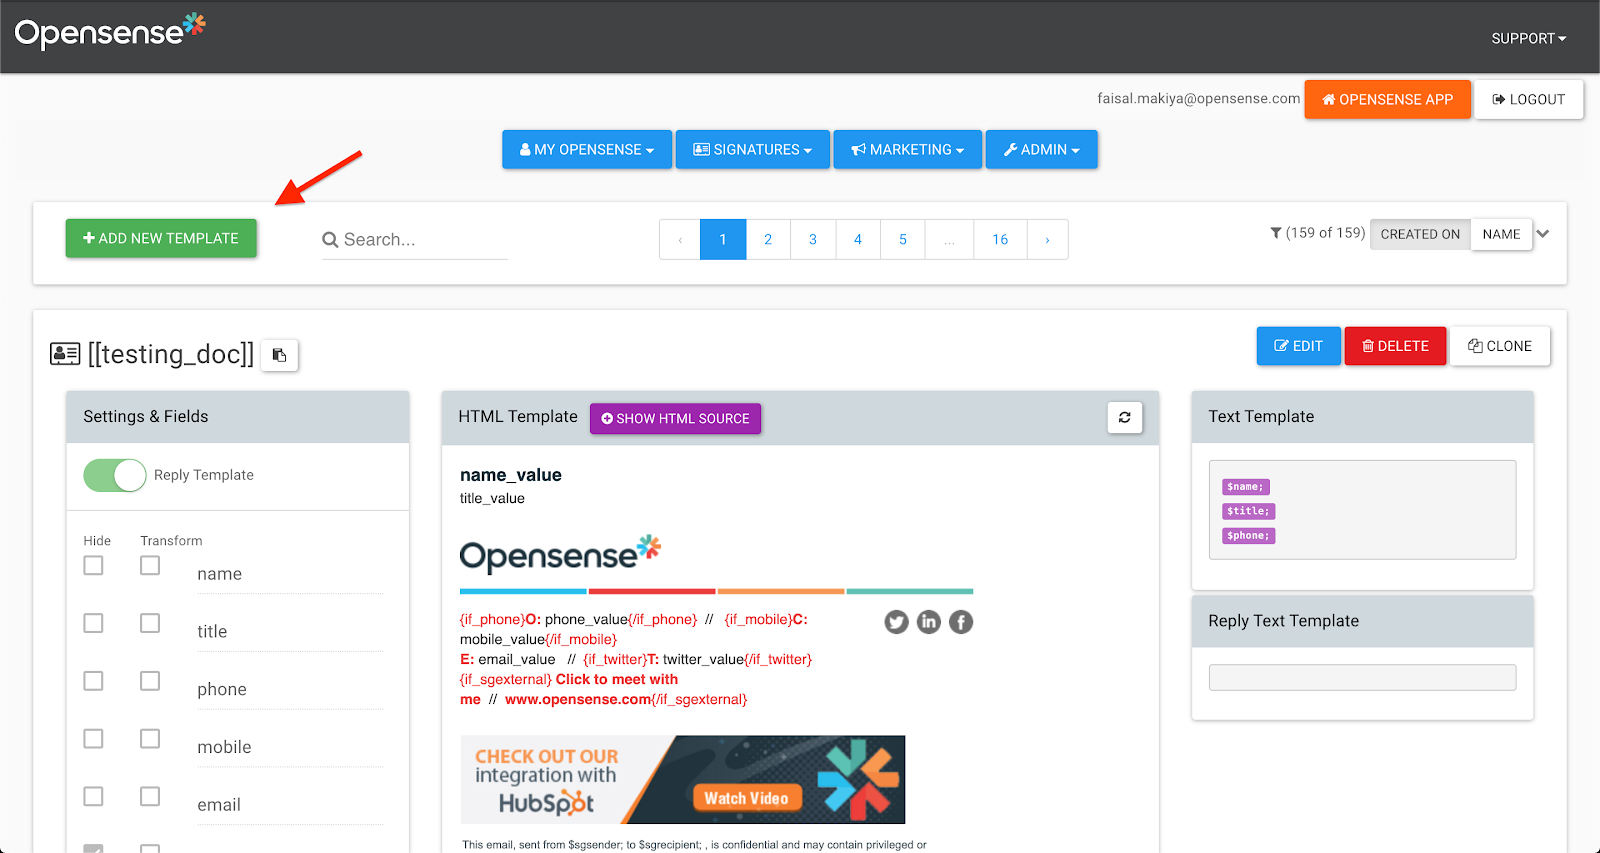
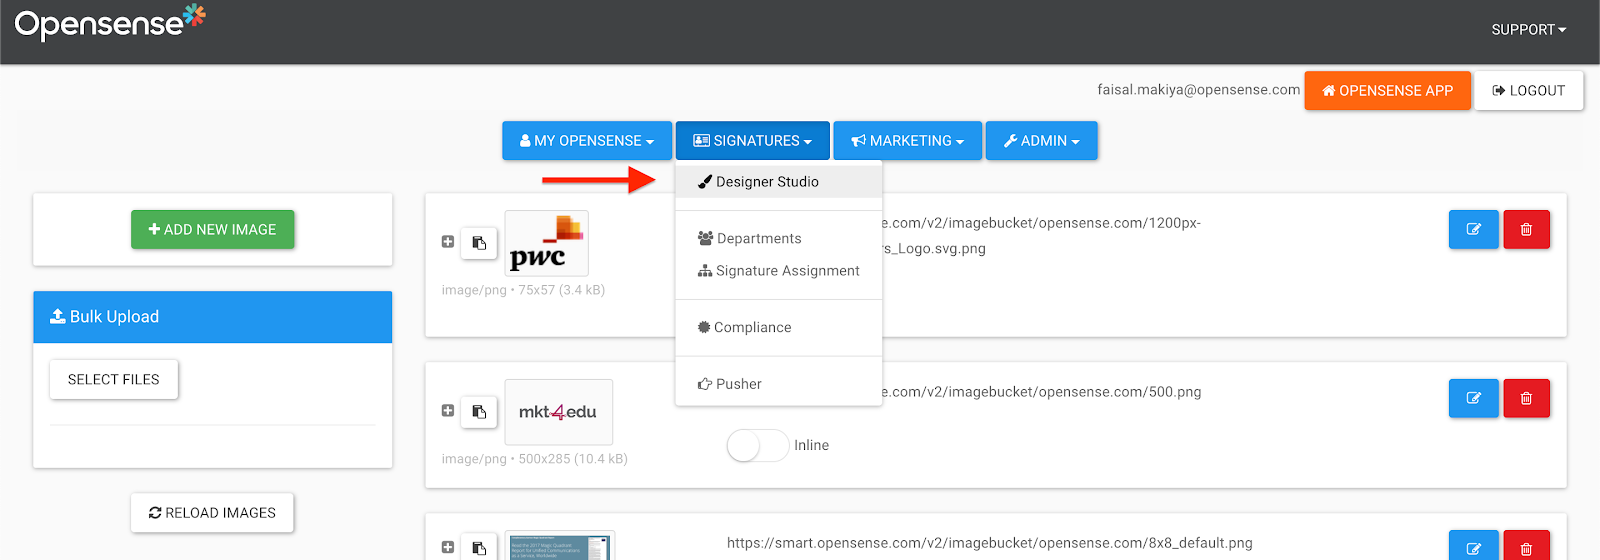
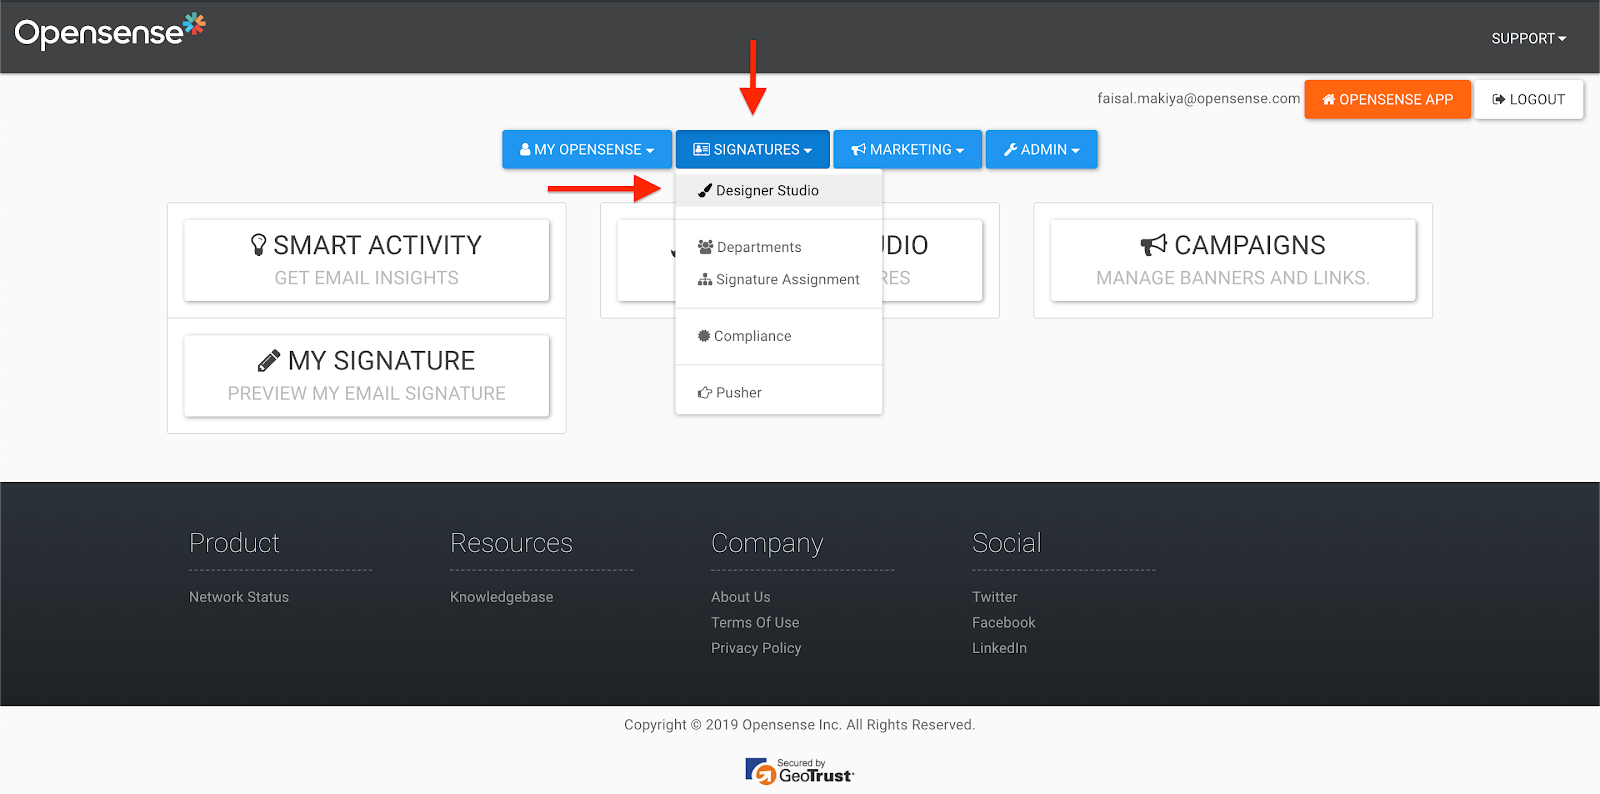
Open the **Signatures** menu, and select **Designer Studio**.
### Creating and editing a signature template
1. Select the green **Add New Template** button.
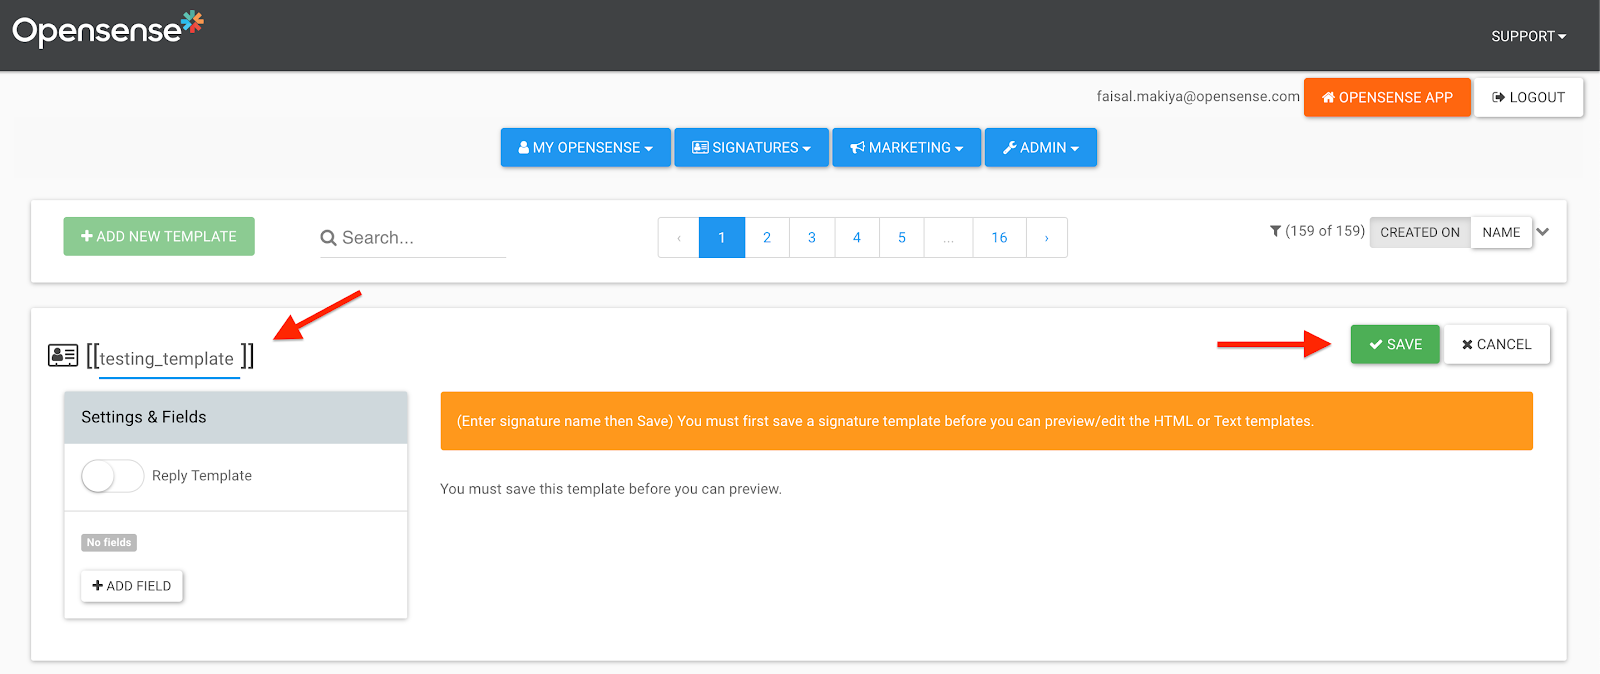
2. Name your template (see [Naming conventions and syntax](#naming-conventions-and-syntax)), and select **Save**.
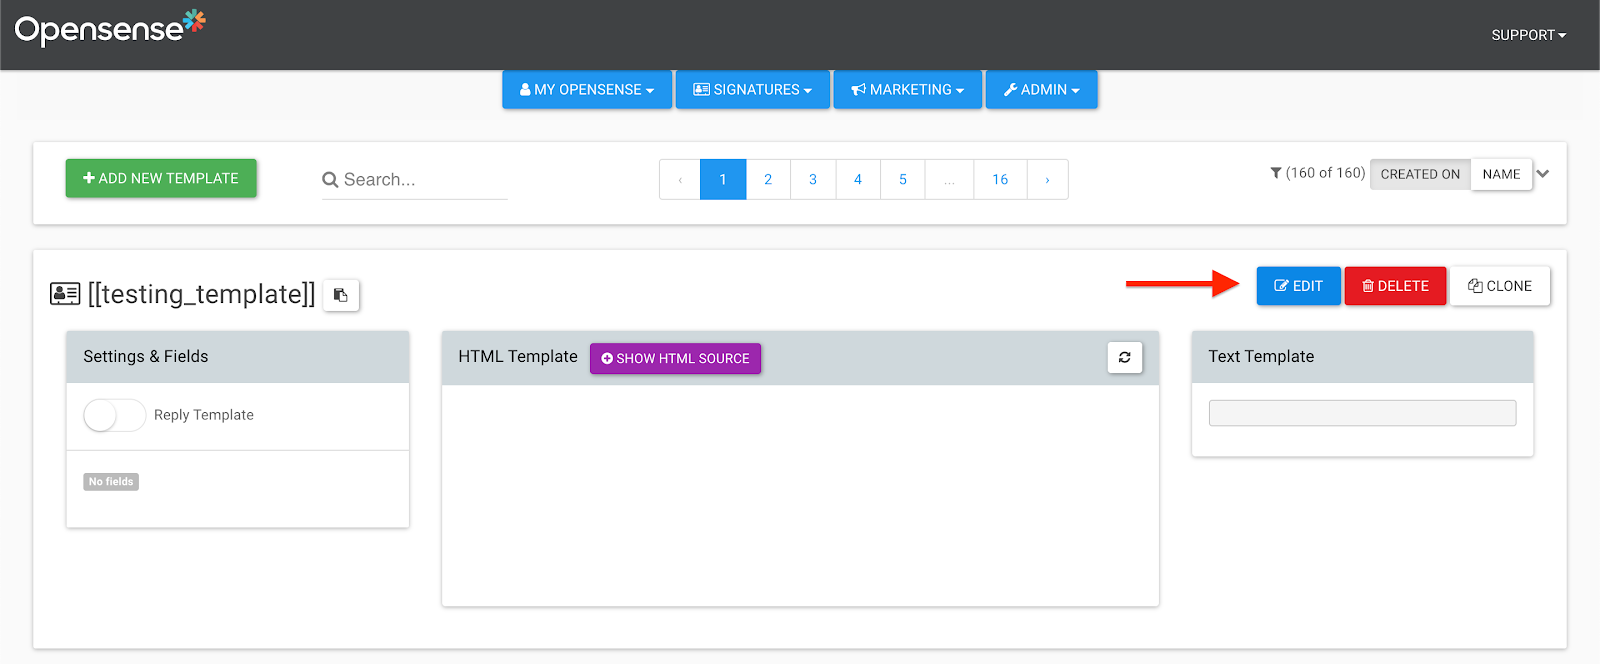
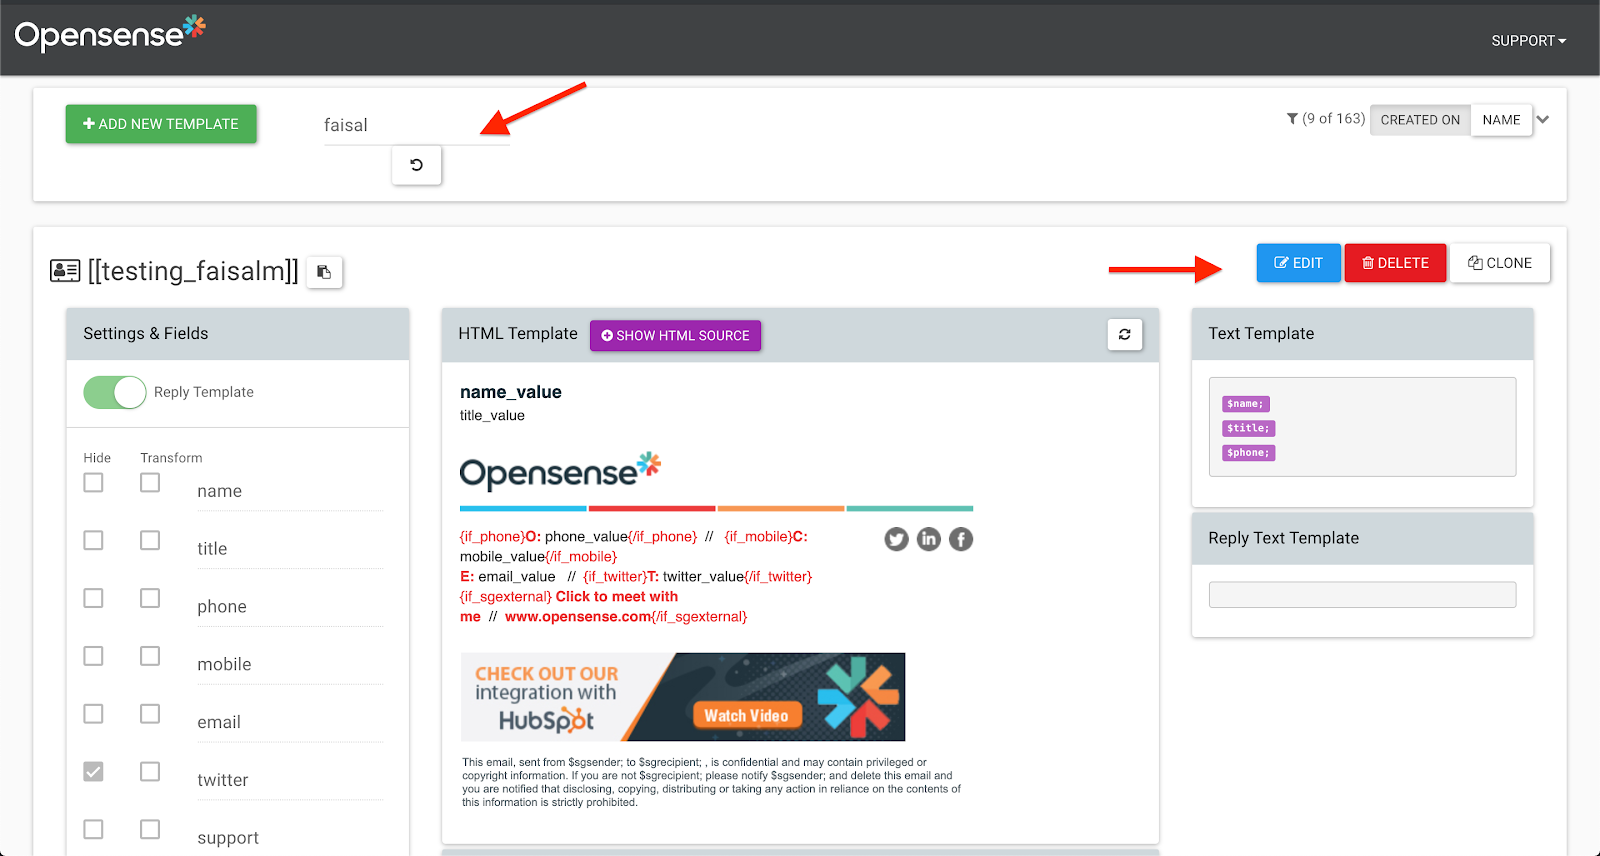
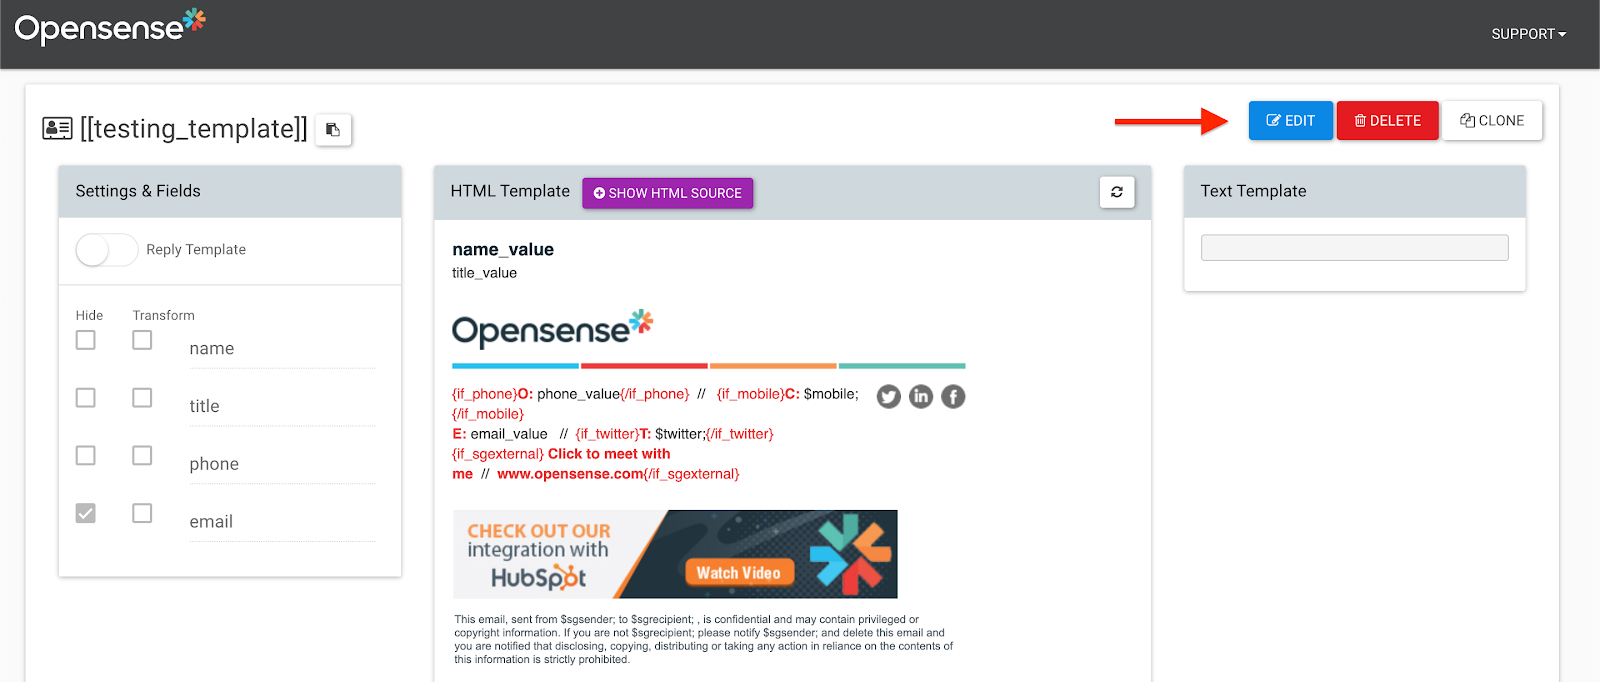
3. To edit your signature template, select **Edit**.
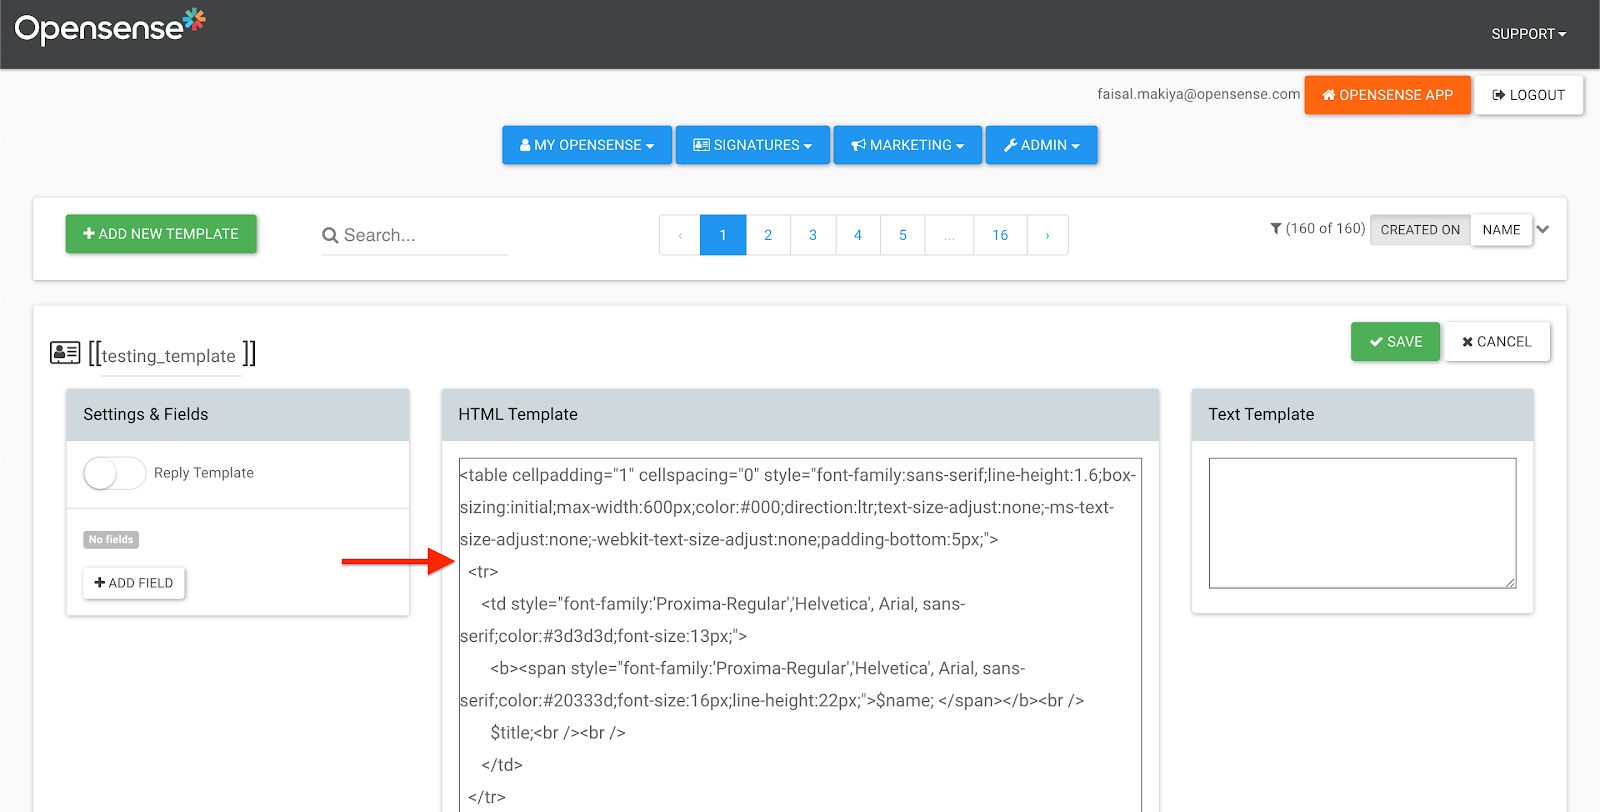
4. Add or edit your HTML in the **HTML Template** box.
### Replacing an image
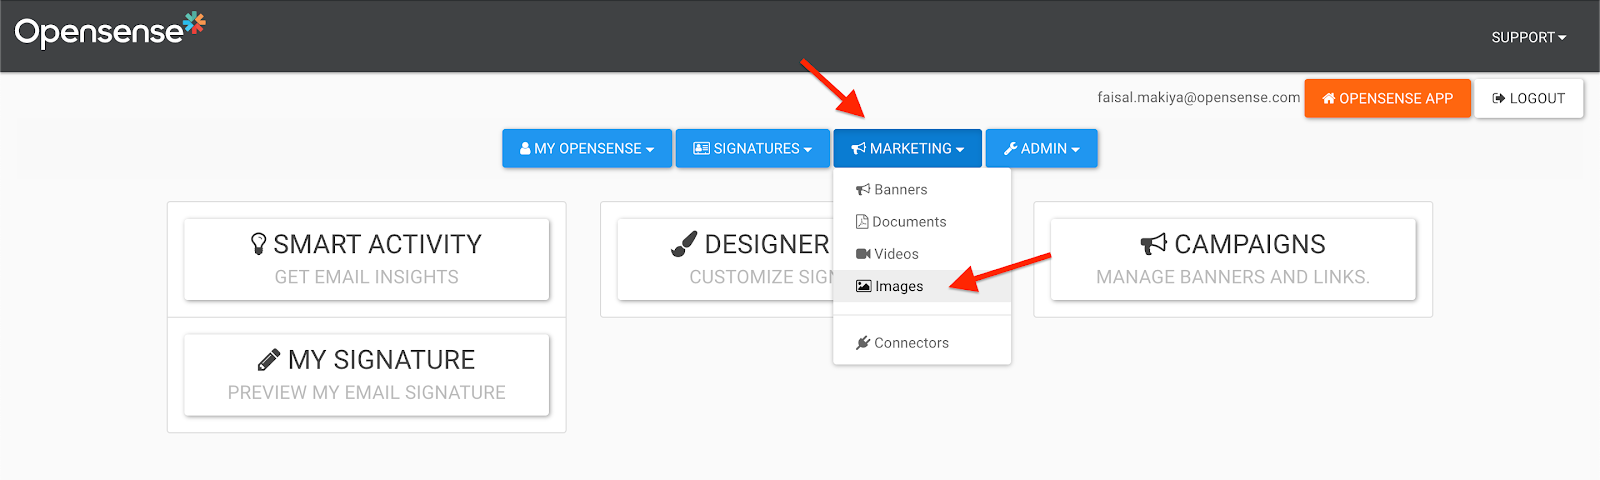
1. Open the **Marketing** menu, and select **Images**.
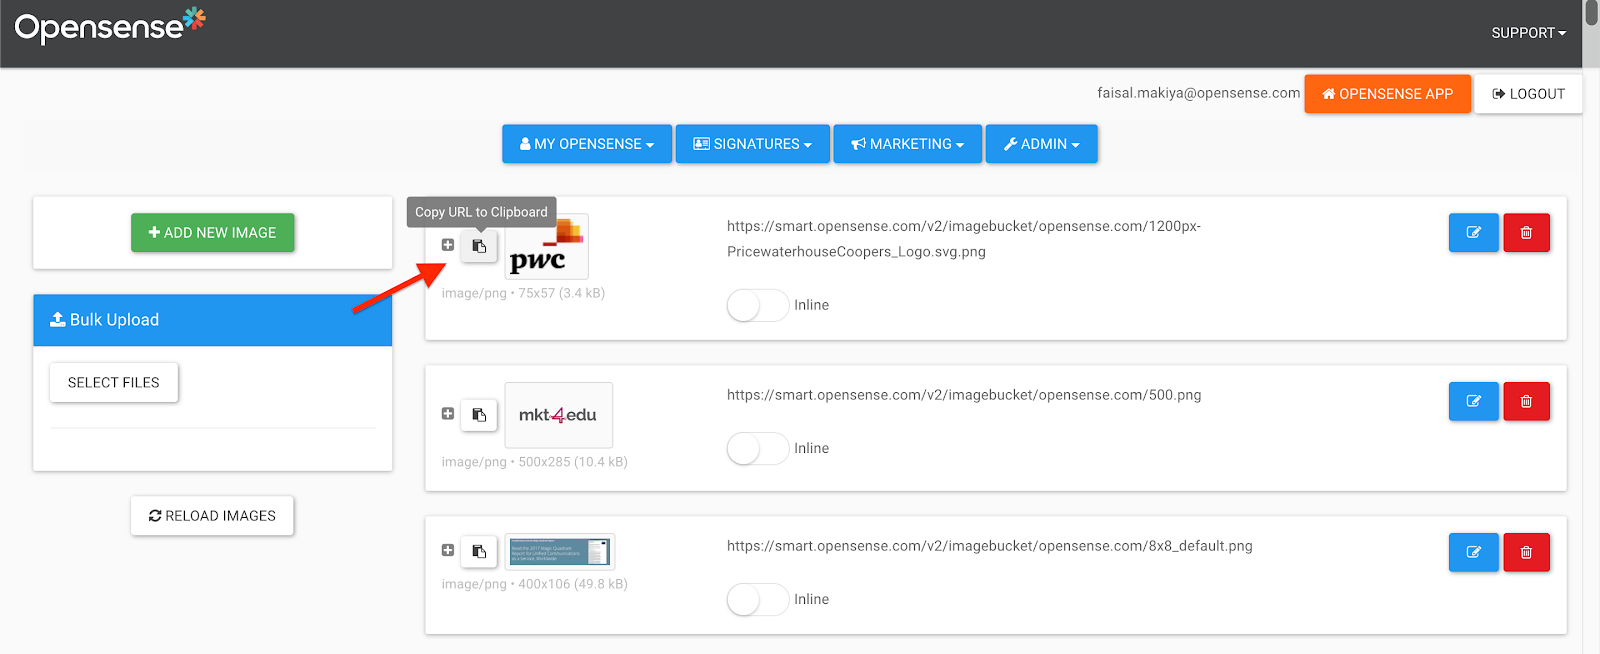
2. Find the image you want to use, and select its copy button  (**Copy URL to Clipboard**) to copy its URL.
3. Open the **Signatures** menu, and select **Designer Studio**.
4. In Designer Studio, search for your signature template, and select **Edit**.
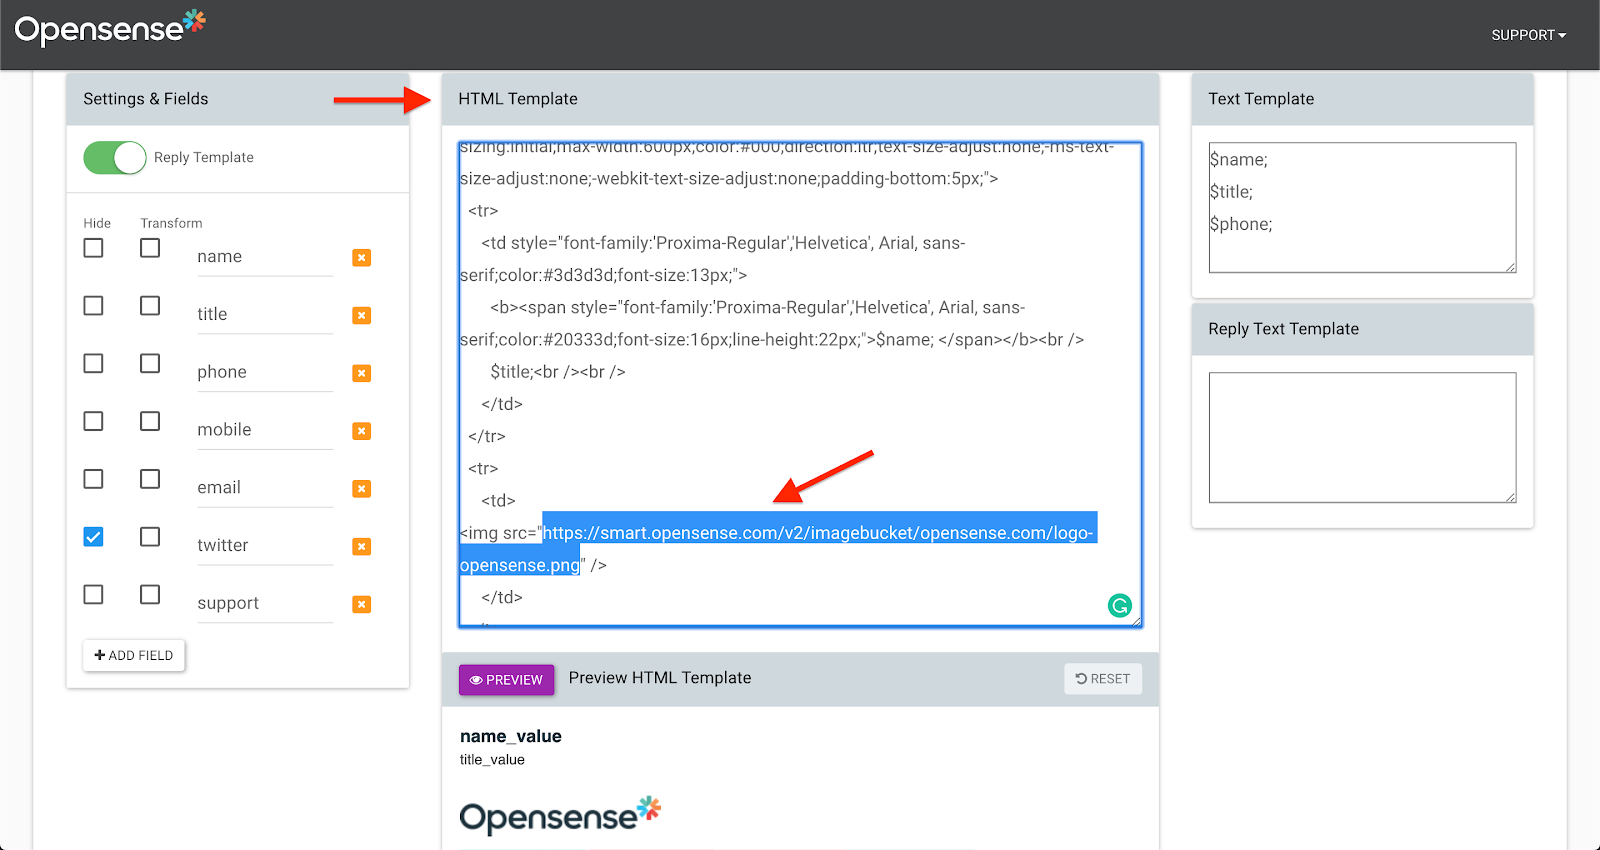
5. In the **HTML Template** box, find the URL of the image you want to replace.
6. Highlight the URL of the image you want to change. Highlight only the text between the quotation marks.
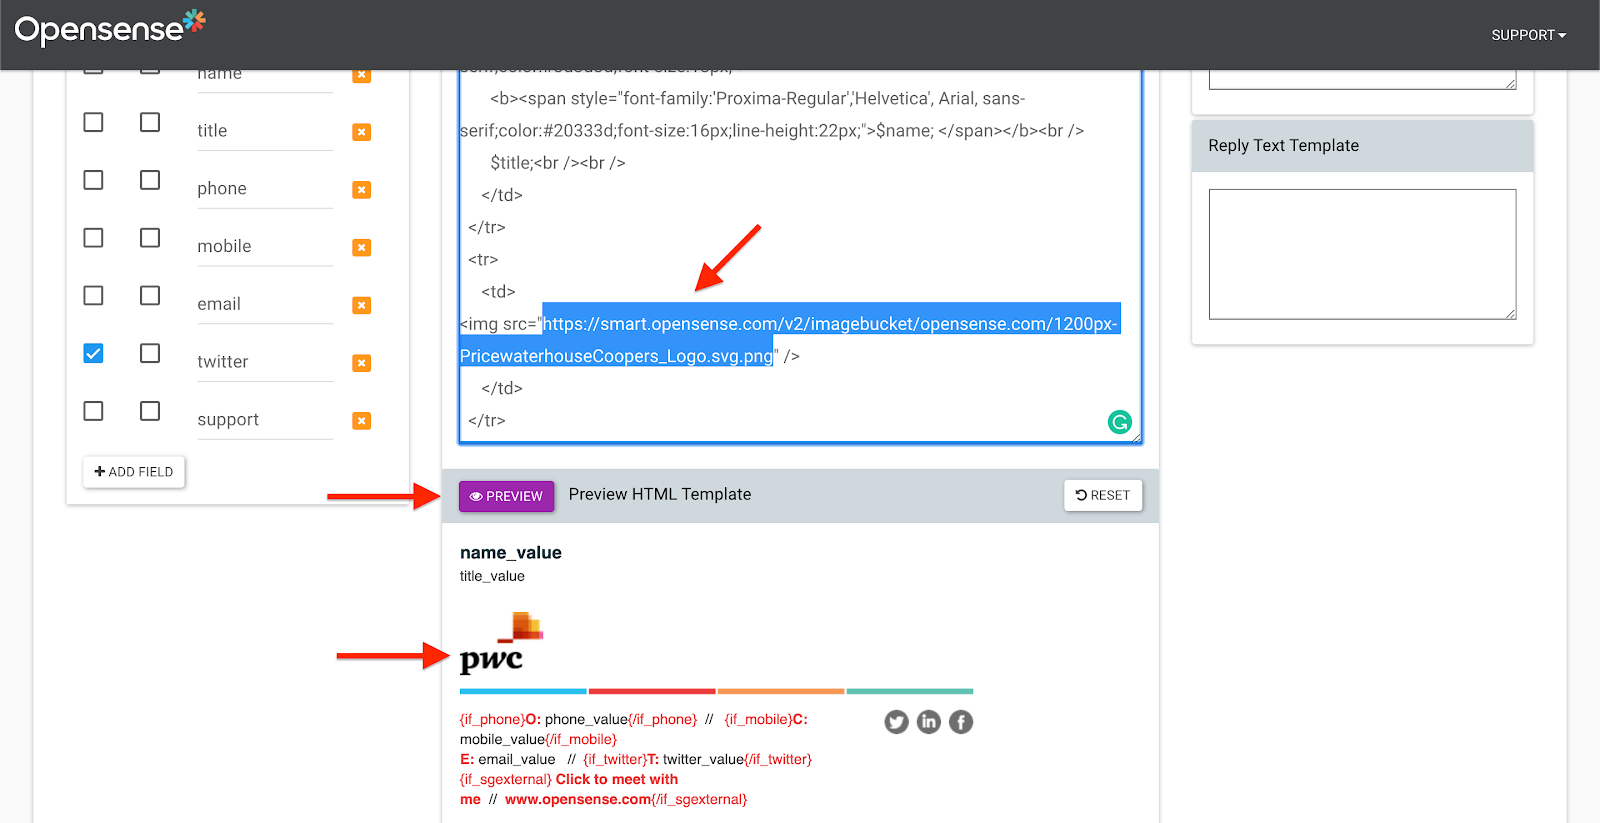
7. Paste the URL you copied in step 2 over the highlighted URL.
8. Select the purple **Preview** button.
9. When you're happy with the result, select the green **Save** button.
### Replacing a link
1. In a signature's HTML editor, find the link after the `href` attribute.
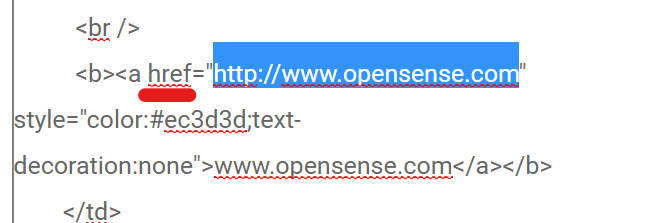
2. Highlight the link you want to replace, and type or paste the URL you want recipients to visit when they select it.
3. When you're done, select the green **Save** button.
### Adding fields
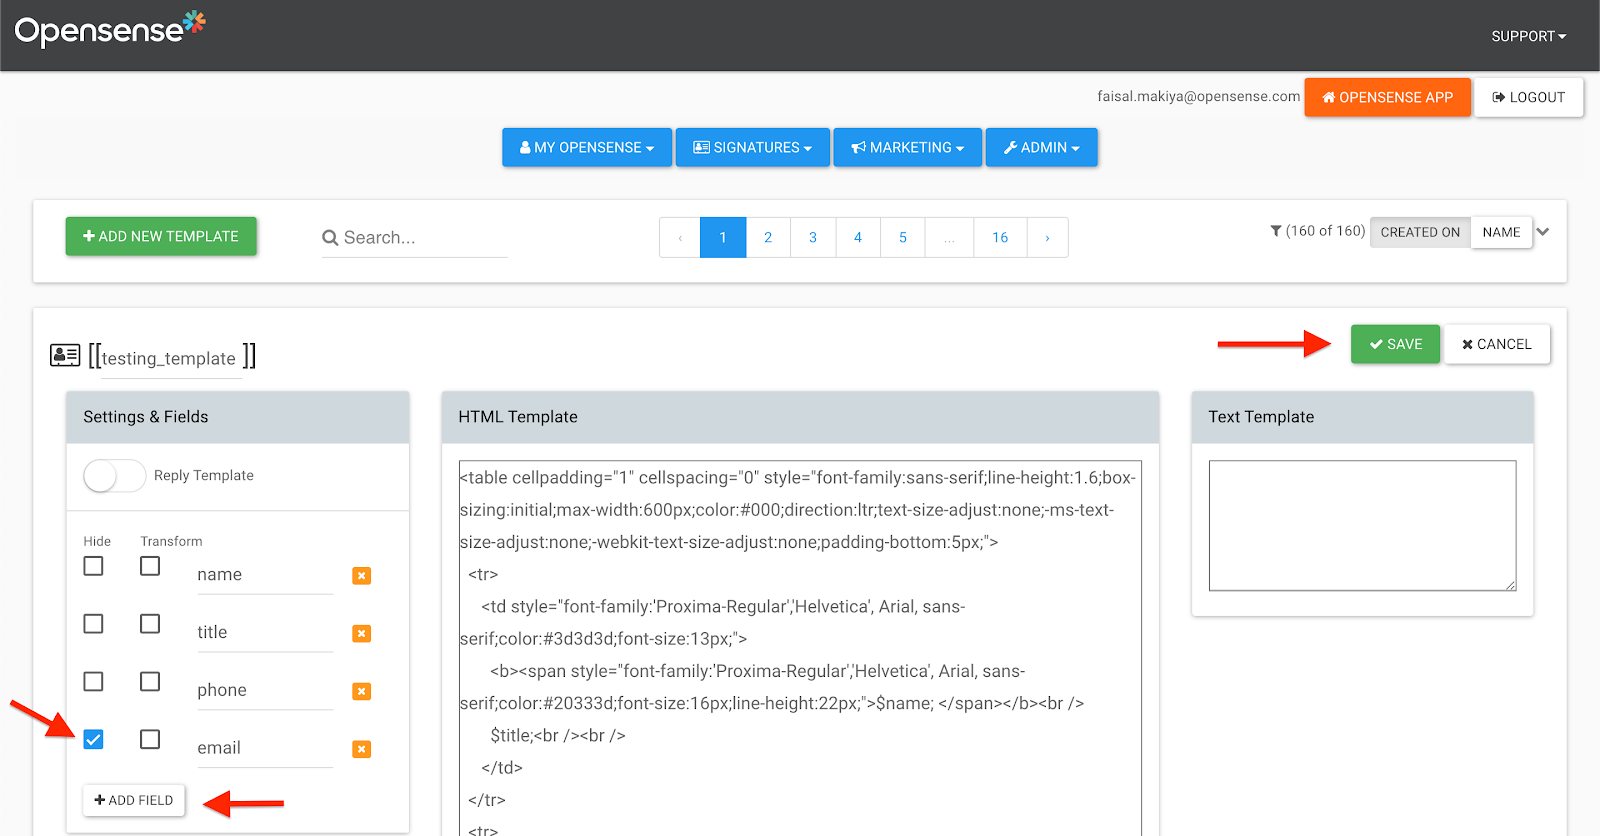
Select **+ Add Field**, and type your field names. To hide a field in your plain-text signature block, select its **Hide** box. When you're done, select **Save**.
Name your fields with the [naming conventions](#naming-conventions-and-syntax). You also need to add these custom fields to your HTML templates (for example, `$title;`).
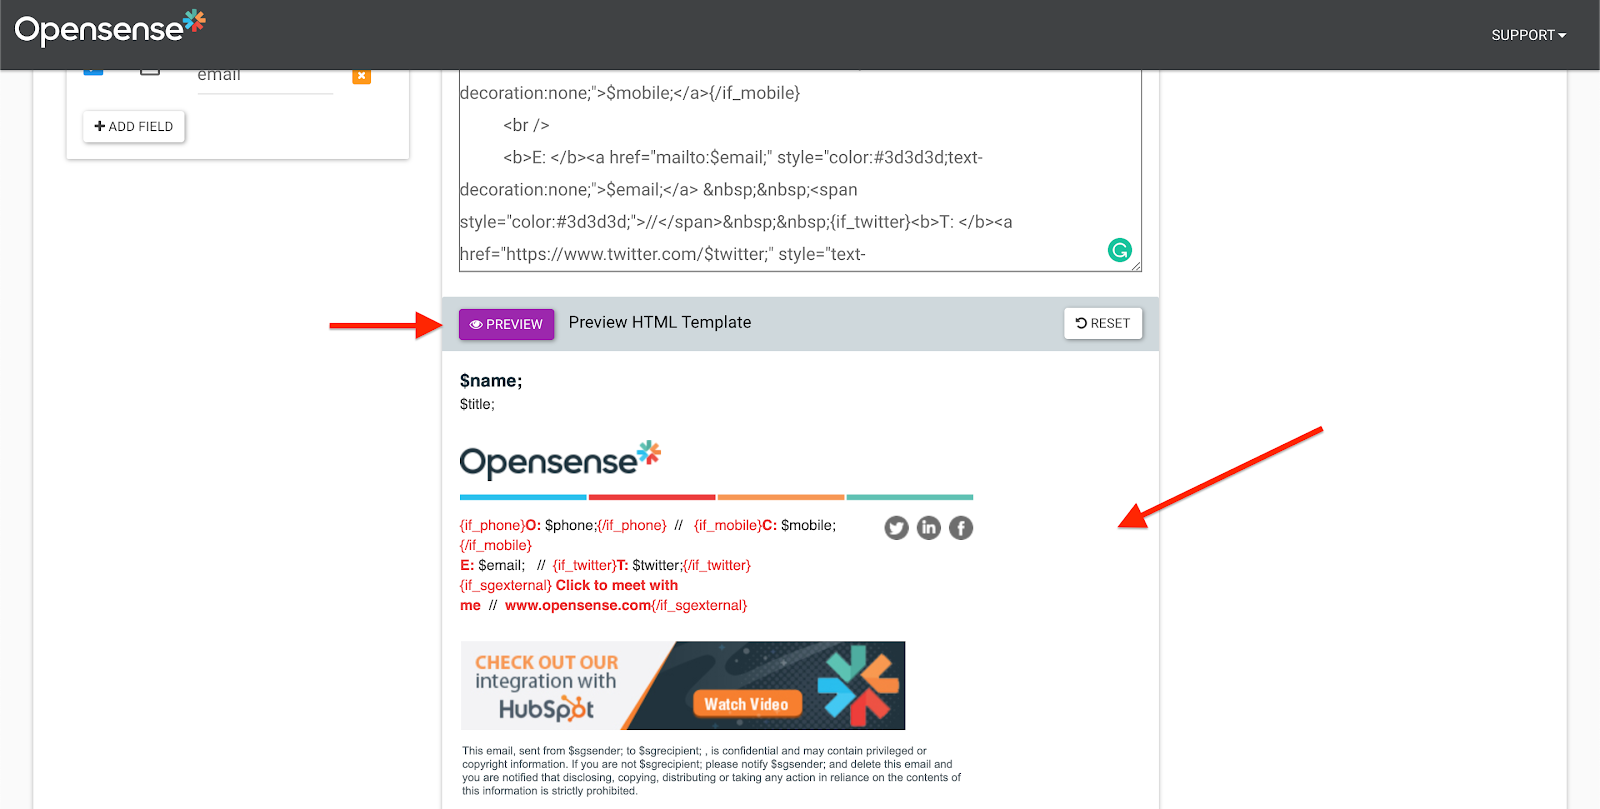
To preview any edits before you save, select the purple **Preview** button.
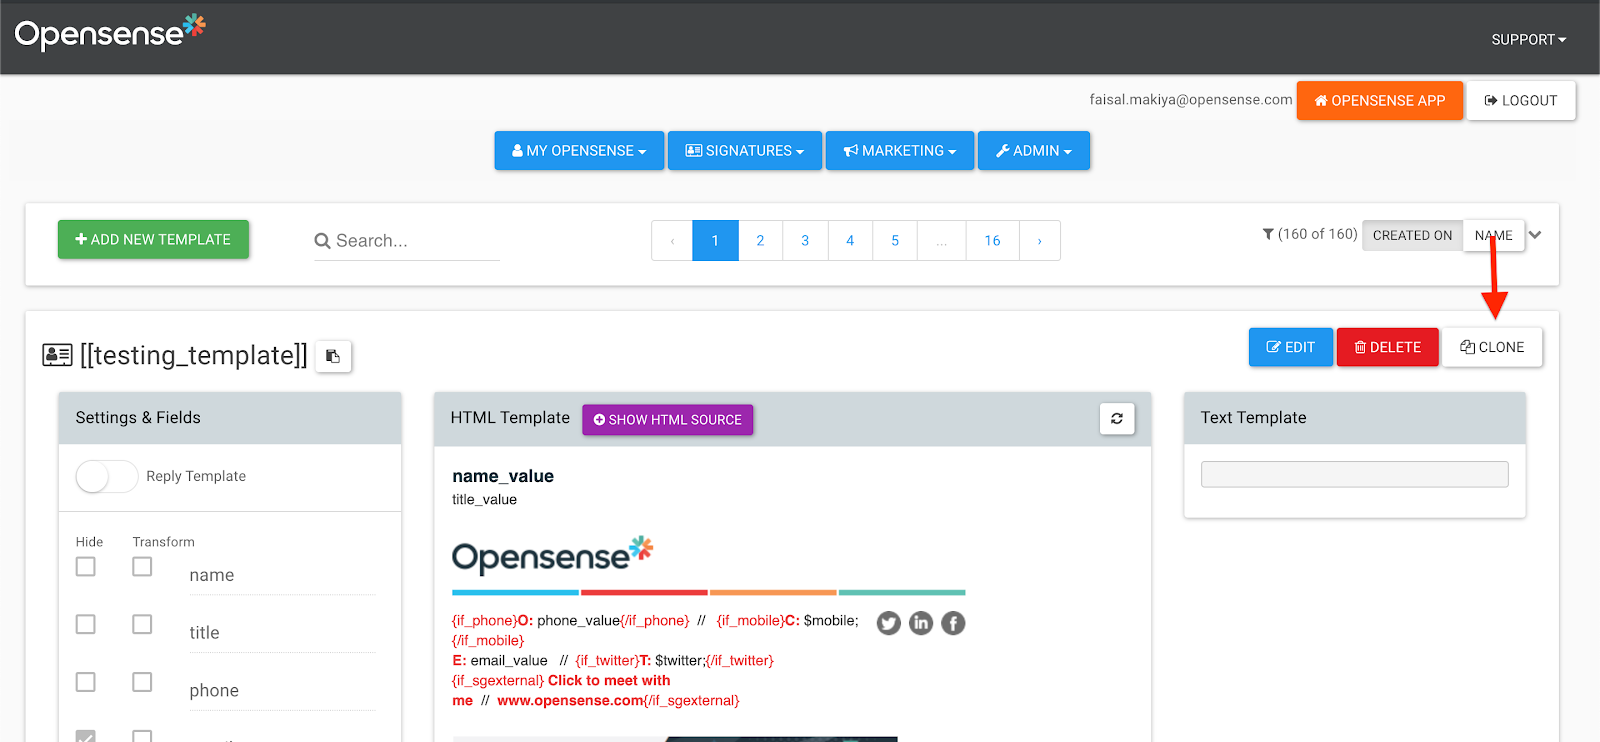
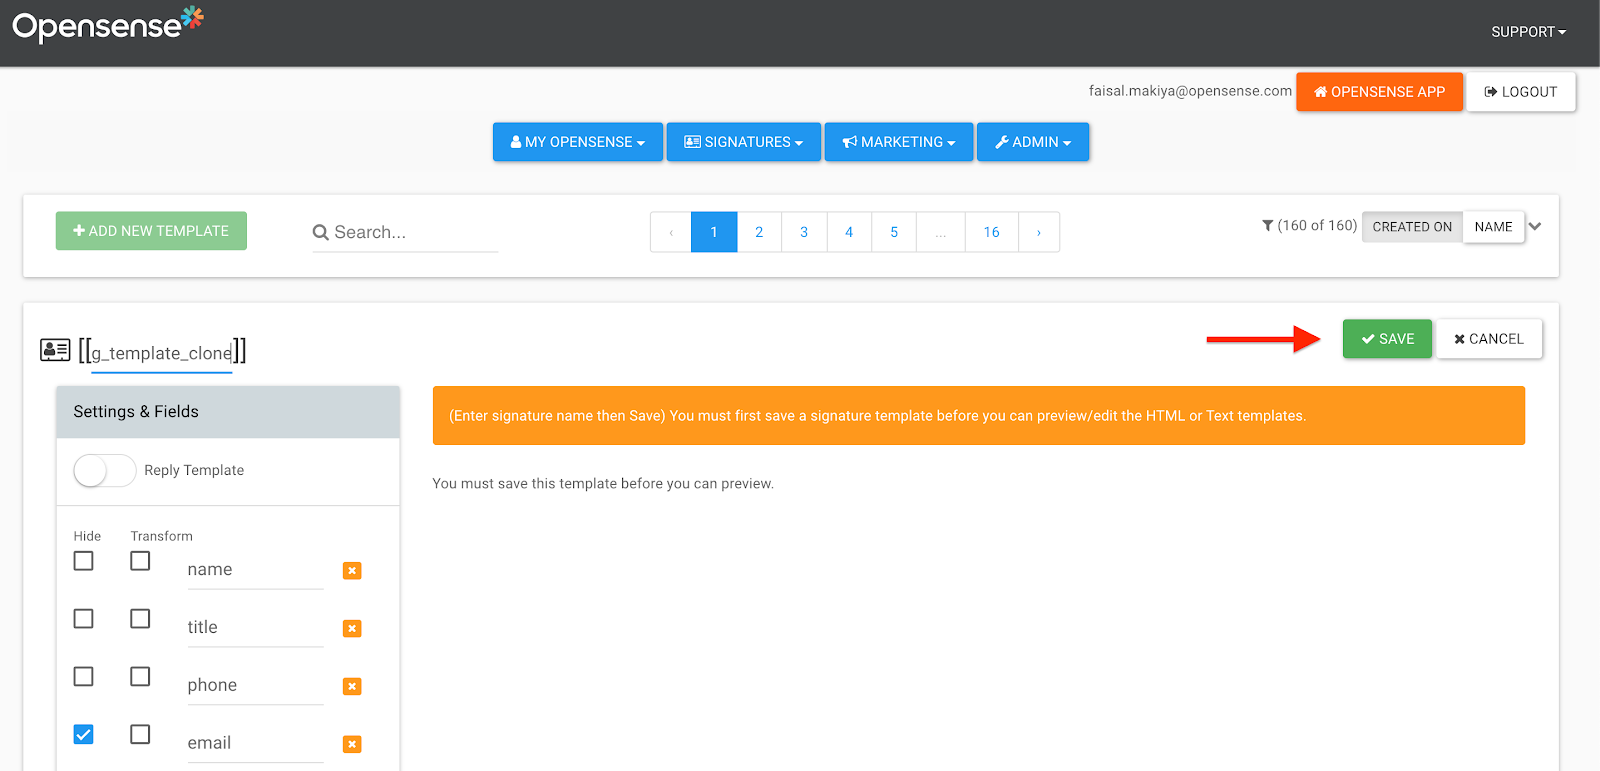
### Cloning a signature template
1. Select **Clone**.
2. Name the clone (see the [naming conventions](#naming-conventions-and-syntax)), and select **Save**.
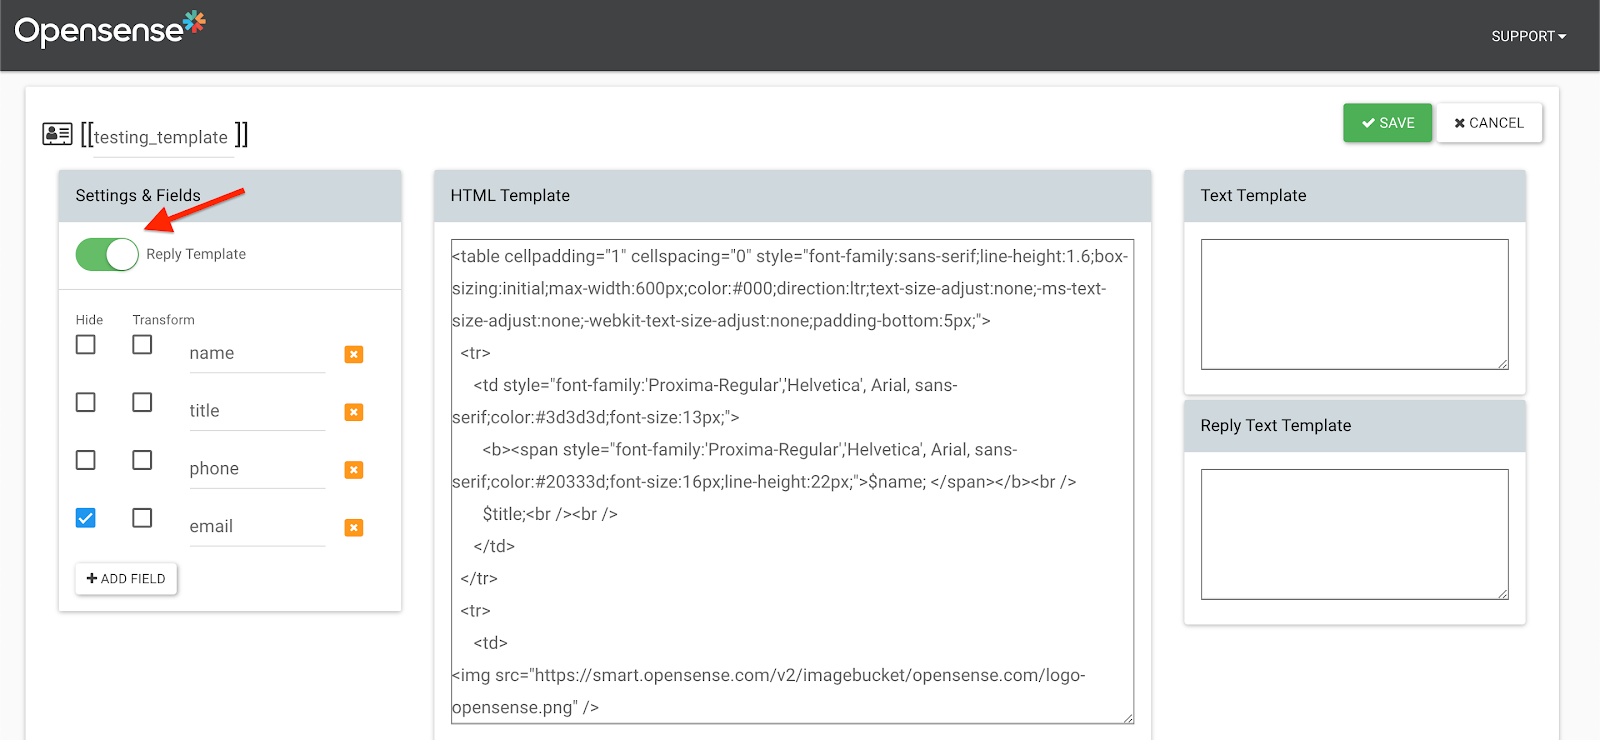
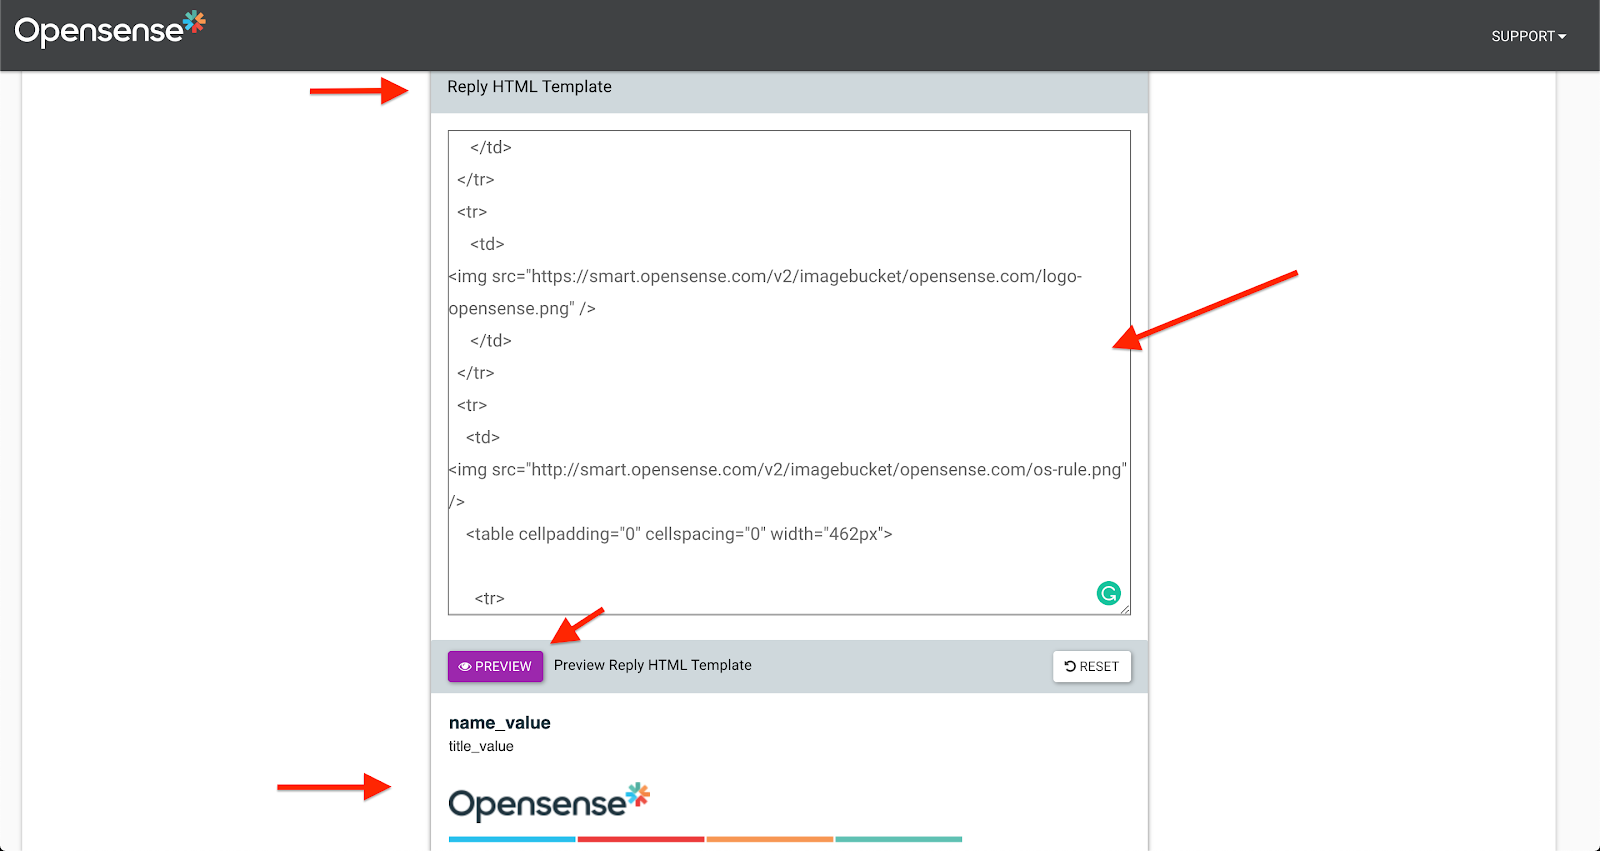
### Creating or editing a reply template
1. Select **Edit** on the signature you want to add a reply template to.
2. Turn on the **Reply Template** toggle, so it shows green.
3. Scroll down to the **Reply HTML Template** box, and add your HTML to create your reply template. To preview it, select the purple **Preview** button.
4. When you're done, select **Save**.
### Adding a plain-text signature
The plain-text template is used if an email recipient doesn't allow HTML (uncommon).
1. In Designer Studio, go to your signature template, and select the blue **Edit** button.
2. In the **Text Template** and **Reply Text Template** boxes, type the fields you want in your plain-text signature template (see the [naming conventions](#naming-conventions-and-syntax)).
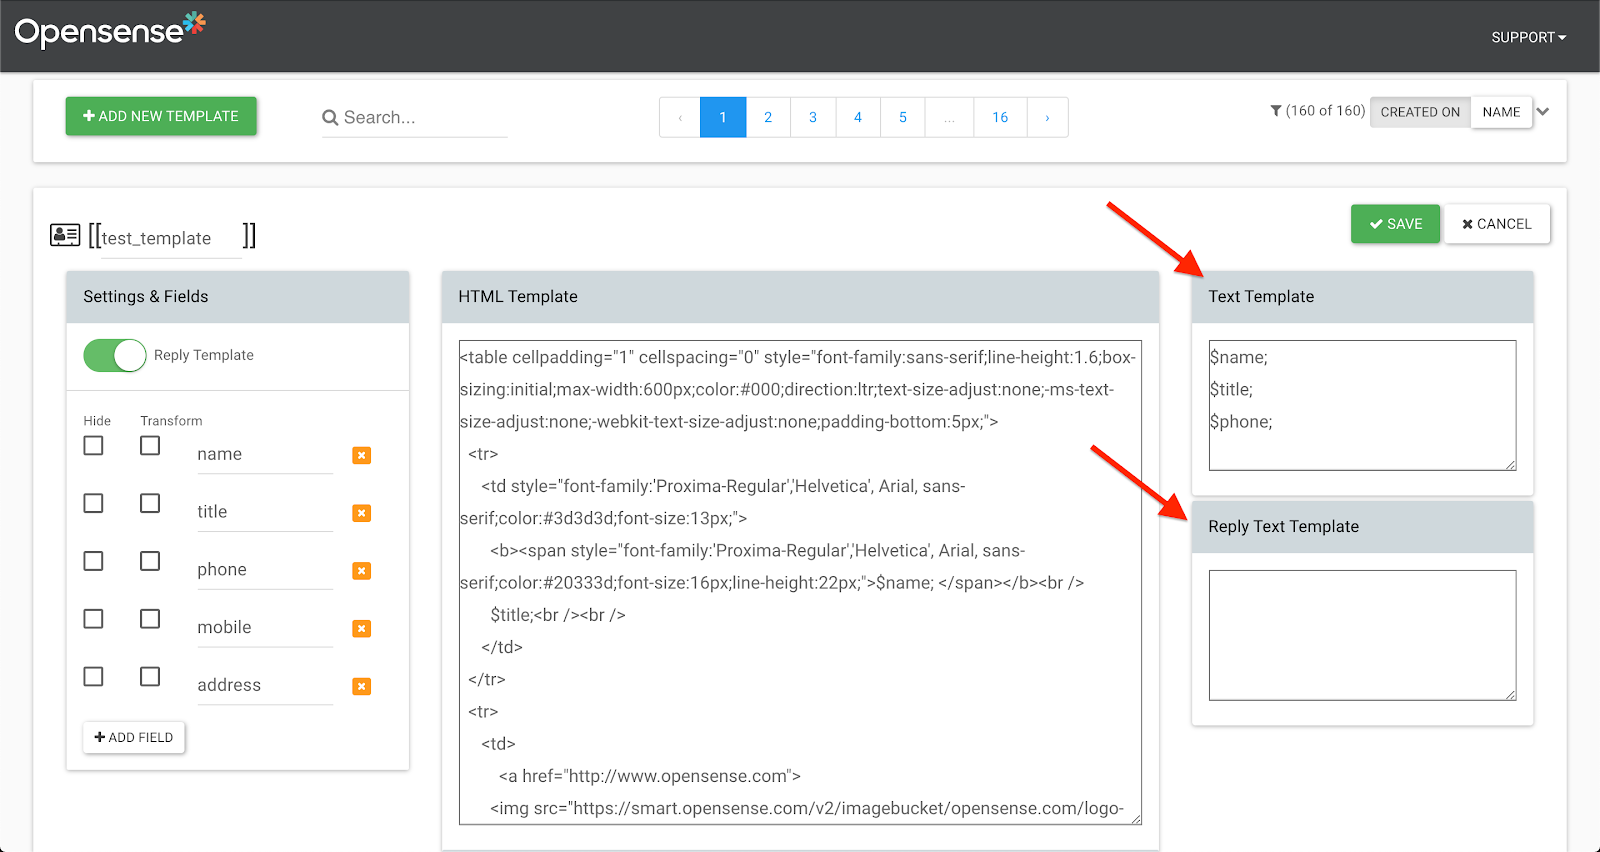
3. When you're done, select the green **Save** button.
## Departments: managing groups of users
### Creating a department
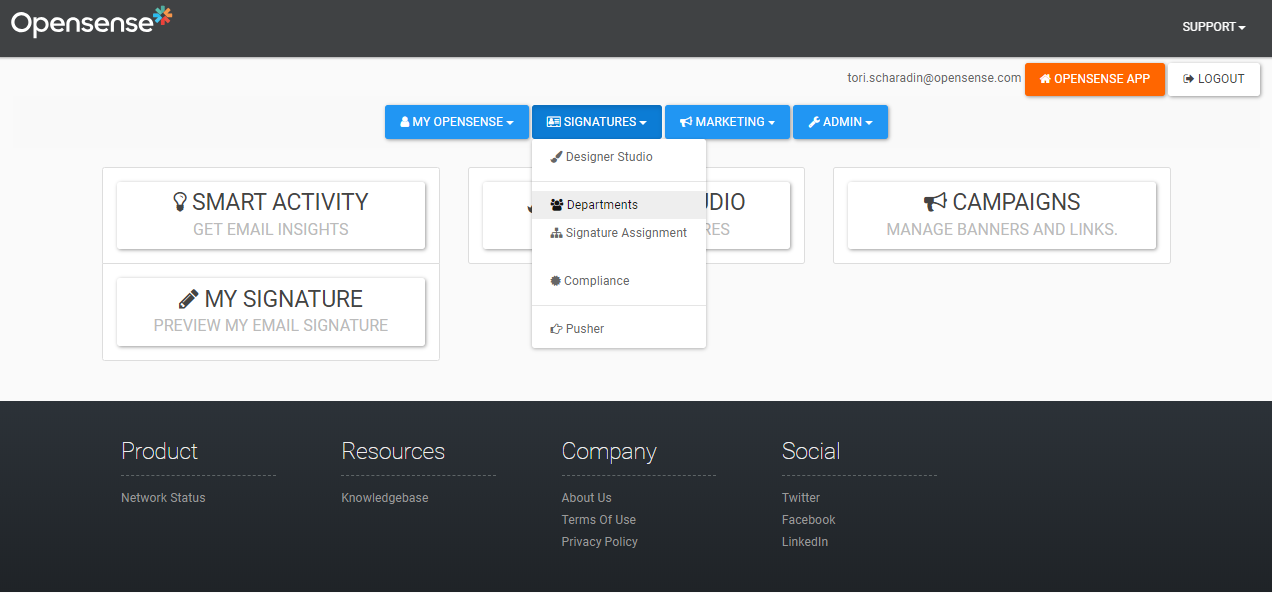
1. After you sign in to Opensense, open the **Signatures** menu, and select **Departments**.
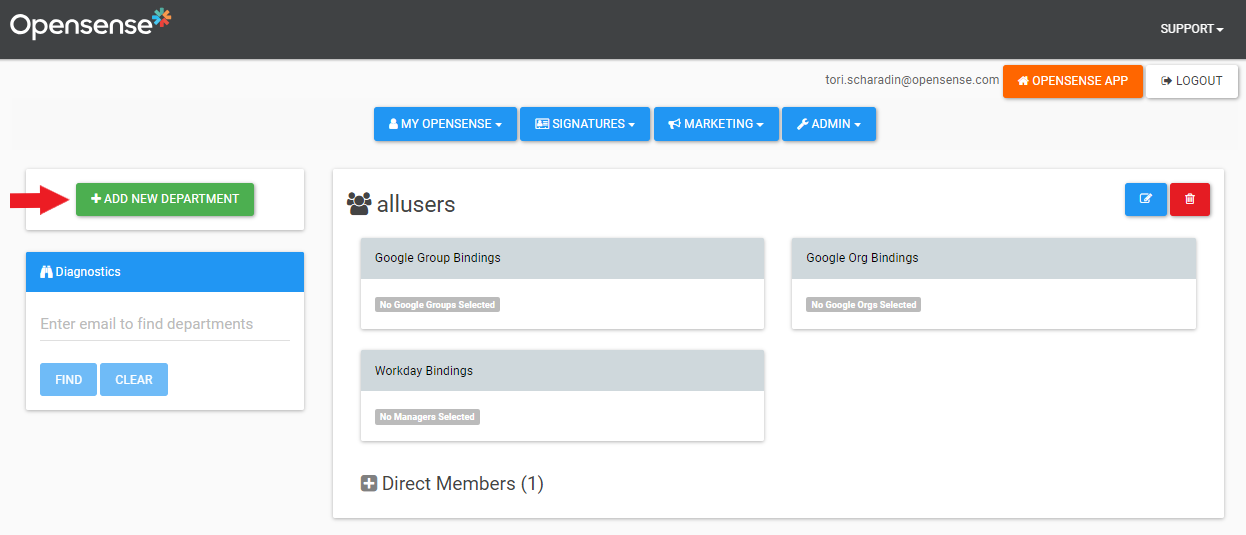
2. Select the green **Add New Department** button.
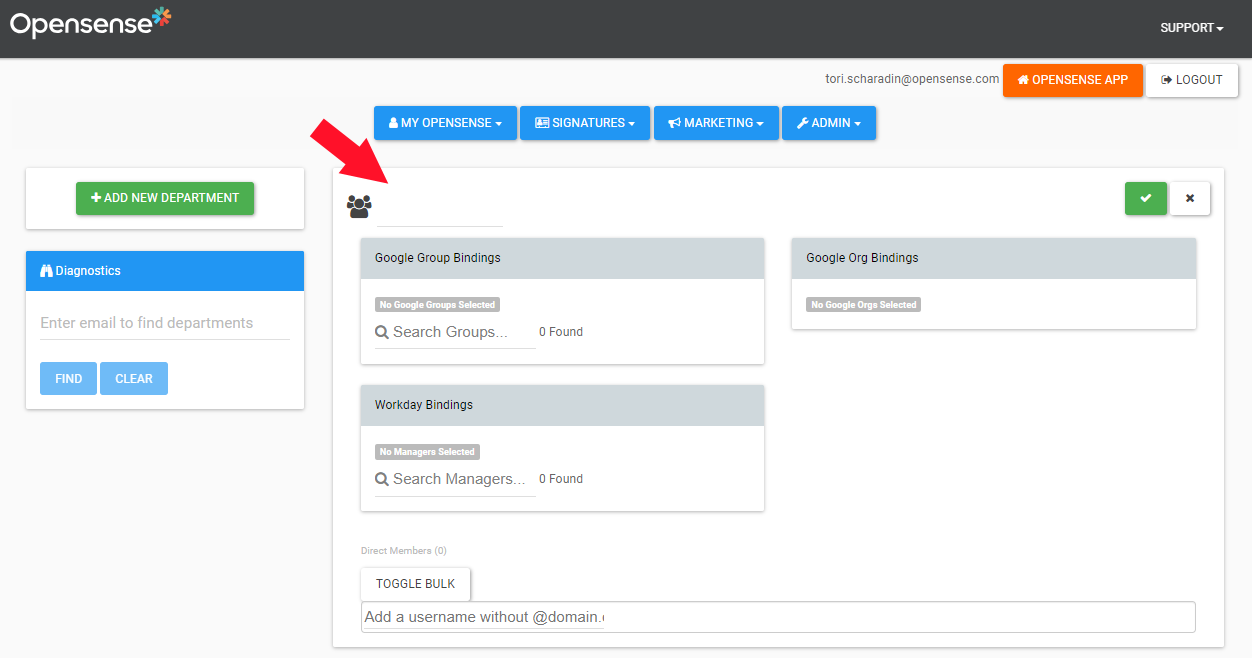
3. Next to the icon with three people
(**Copy URL to Clipboard**) to copy its URL.
3. Open the **Signatures** menu, and select **Designer Studio**.
4. In Designer Studio, search for your signature template, and select **Edit**.
5. In the **HTML Template** box, find the URL of the image you want to replace.
6. Highlight the URL of the image you want to change. Highlight only the text between the quotation marks.
7. Paste the URL you copied in step 2 over the highlighted URL.
8. Select the purple **Preview** button.
9. When you're happy with the result, select the green **Save** button.
### Replacing a link
1. In a signature's HTML editor, find the link after the `href` attribute.

2. Highlight the link you want to replace, and type or paste the URL you want recipients to visit when they select it.
3. When you're done, select the green **Save** button.
### Adding fields
Select **+ Add Field**, and type your field names. To hide a field in your plain-text signature block, select its **Hide** box. When you're done, select **Save**.
Name your fields with the [naming conventions](#naming-conventions-and-syntax). You also need to add these custom fields to your HTML templates (for example, `$title;`).
To preview any edits before you save, select the purple **Preview** button.
### Cloning a signature template
1. Select **Clone**.
2. Name the clone (see the [naming conventions](#naming-conventions-and-syntax)), and select **Save**.
### Creating or editing a reply template
1. Select **Edit** on the signature you want to add a reply template to.
2. Turn on the **Reply Template** toggle, so it shows green.
3. Scroll down to the **Reply HTML Template** box, and add your HTML to create your reply template. To preview it, select the purple **Preview** button.
4. When you're done, select **Save**.
### Adding a plain-text signature
The plain-text template is used if an email recipient doesn't allow HTML (uncommon).
1. In Designer Studio, go to your signature template, and select the blue **Edit** button.
2. In the **Text Template** and **Reply Text Template** boxes, type the fields you want in your plain-text signature template (see the [naming conventions](#naming-conventions-and-syntax)).

3. When you're done, select the green **Save** button.
## Departments: managing groups of users
### Creating a department
1. After you sign in to Opensense, open the **Signatures** menu, and select **Departments**.
2. Select the green **Add New Department** button.
3. Next to the icon with three people  , name the department.
4. Select the green check button in the upper-right corner of the screen.
### Adding users to departments
, name the department.
4. Select the green check button in the upper-right corner of the screen.
### Adding users to departments
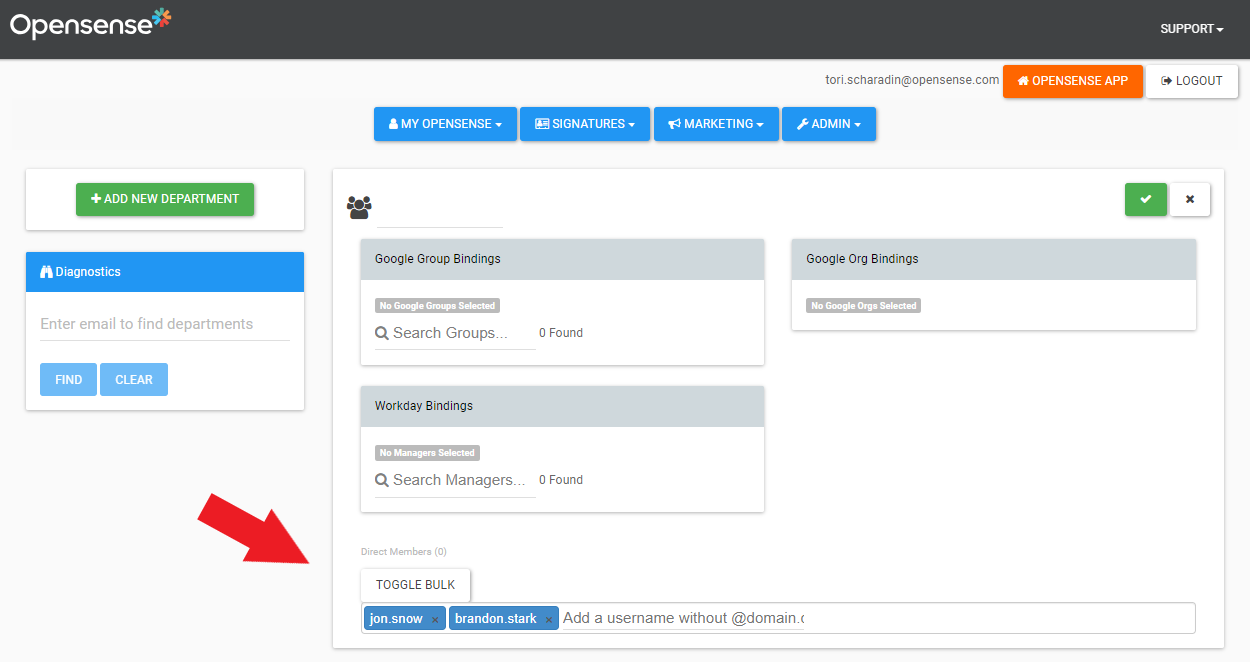
- One user at a time
- In the Add a username without @domain.com box, type the user's email address without the
@domain.com. Tip: press Tab after each username.
- In bulk
- Select the Toggle Bulk button, and paste users, for example from a CSV column.
### Binding a department to your directory
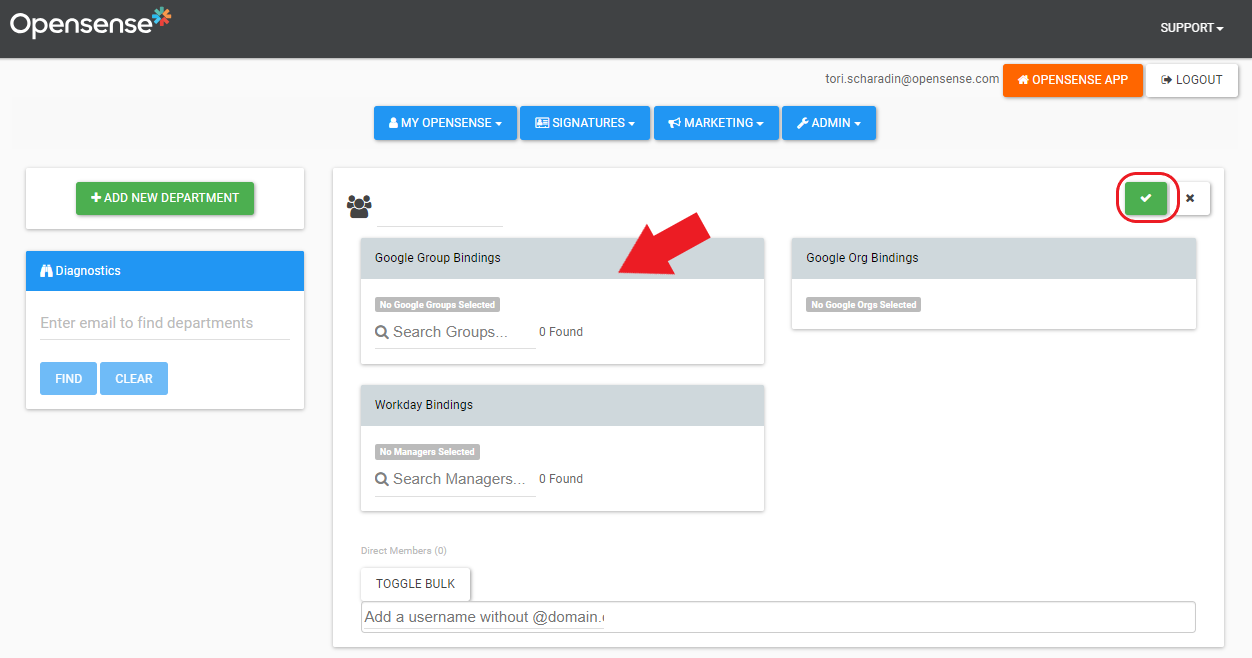
If a department is bound to a directory group, any changes to the directory group are reflected in Opensense automatically, once they sync.
1. On the **Departments** page (**Signatures** > **Departments**), select **Add New Department**, and name the department.
2. Depending on the binding, find your existing directory group, and choose it.
3. Select the green button in the upper right to save.
For more about syncing, see [Running a directory sync manually](https://help.opensense.com/docs/forced-sync-from-a-directory).
## Signature assignment: assigning a signature to a department
### Creating a signature route
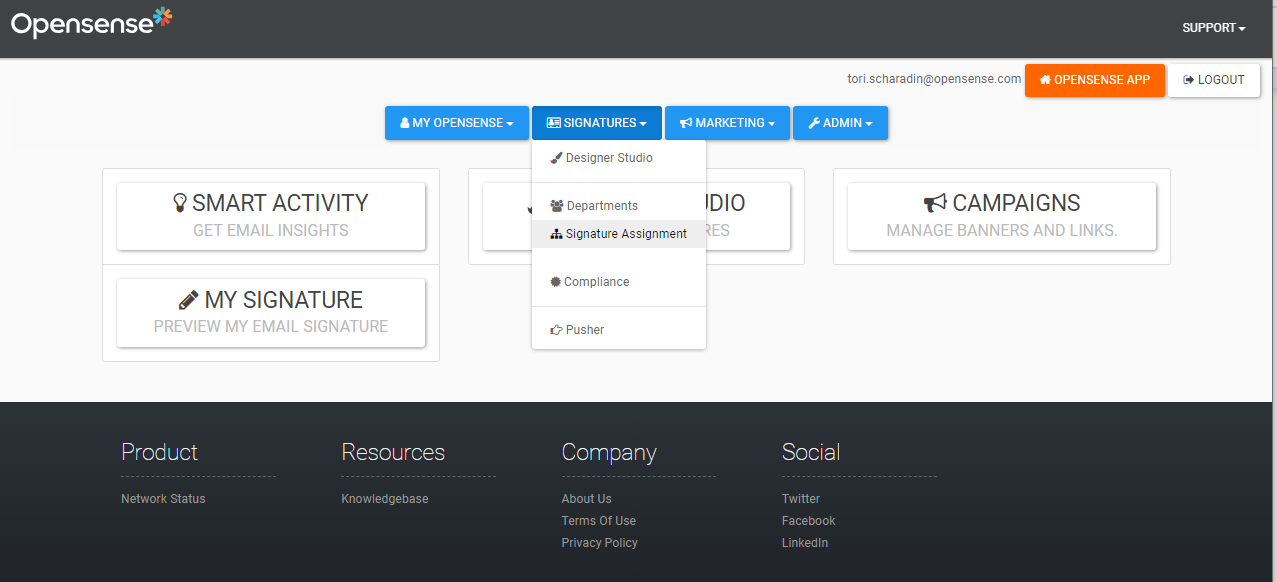
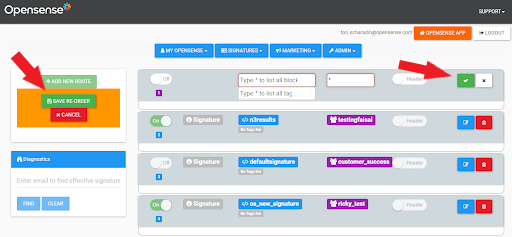
1. After you sign in to Opensense, open the **Signatures** menu, and select **Signature Assignment**.
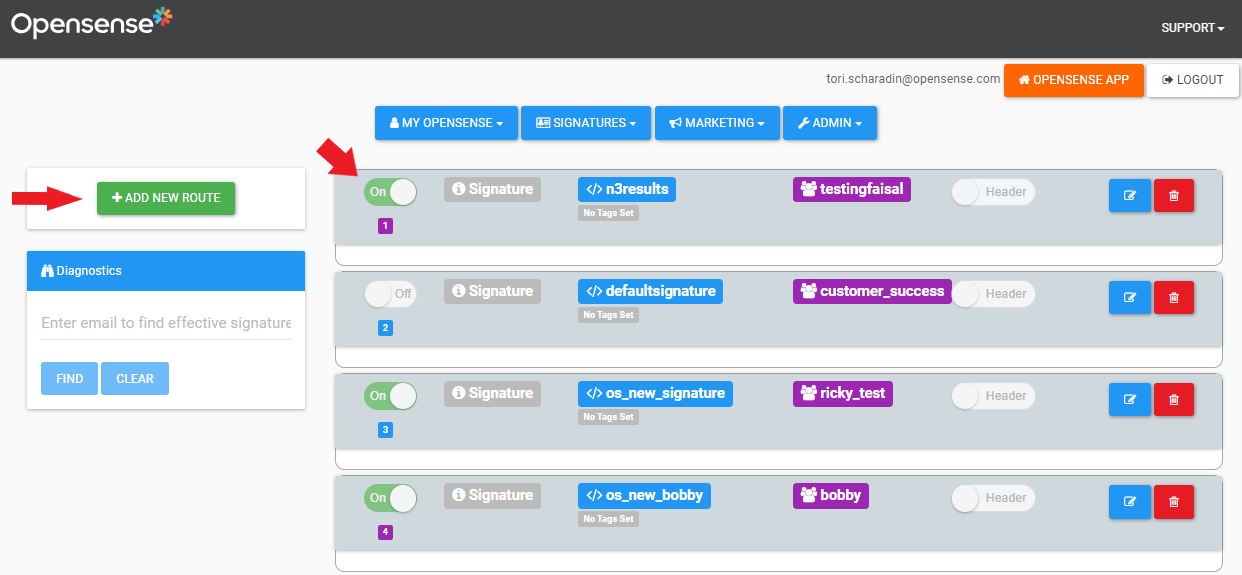
2. Select **Add New Route**, and turn the slider **On**.
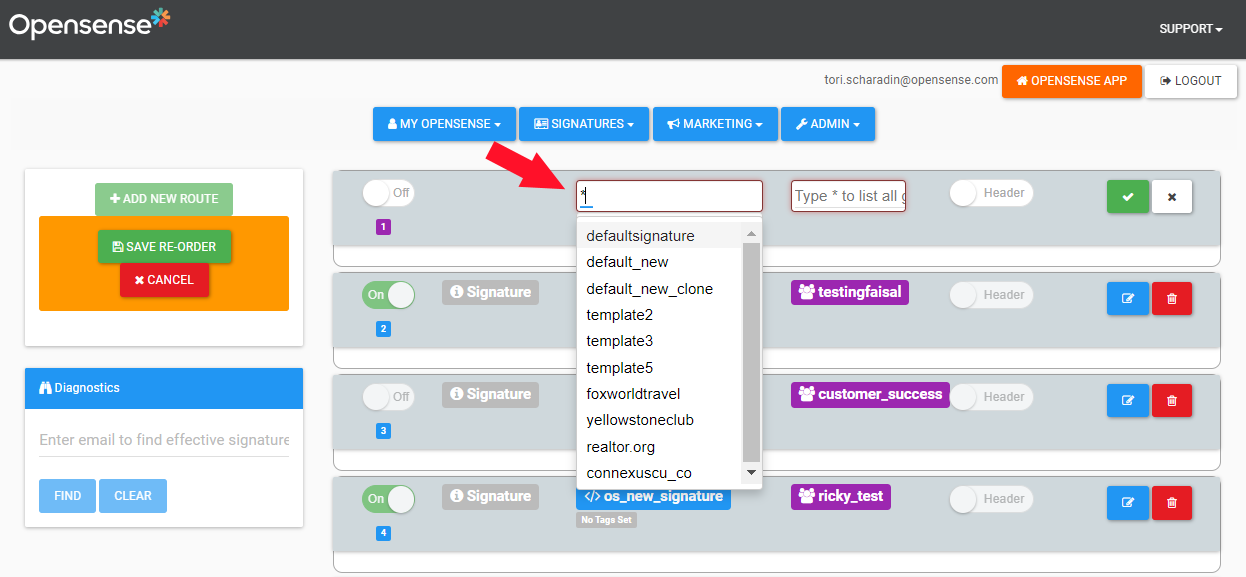
3. In the left box (for signature blocks and templates), type the signature template you want to use. Or type `*` to see all your templates, and select one.
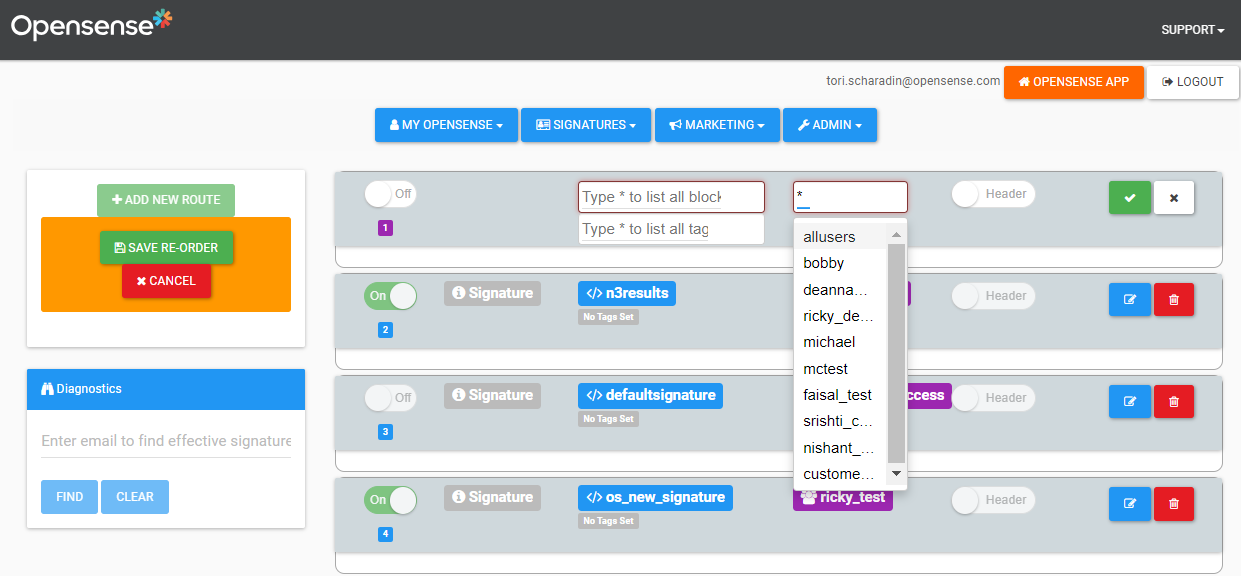
4. In the right box (for groups and departments), type the group or department to assign the signature template to. Or type `*` to see all the departments, and select one.
5. When you've chosen your signature template and group or department, select the green check button  .
### Activating a signature route
1. Select the blue pencil button
.
### Activating a signature route
1. Select the blue pencil button  .
2. Switch the toggle from **Off** to **On**.
3. Select the green check button
.
2. Switch the toggle from **Off** to **On**.
3. Select the green check button  .
4. Every department assigned to the route now gets the selected signature. If a department is assigned to multiple routes, only the highest-priority route is active.

The priority number under the toggle switches shows each route's priority. Drag and drop the signature routes to change their priority. Users who are in more than one department get the highest-priority signature template.
:::tip[Add a catch-all route]
It's best practice to activate a signature route for `allusers`. It works as a catch-all, so every user gets a signature template, even if they aren't assigned to a specific department. To do this, position the "default" template at the bottom of your signature routes.
:::
## Portal access: elevating and toggling permissions
### Granting admin access in Opensense
1. Sign in at [www.opensense.com](https://www.opensense.com/).
2. Open the **Admin** menu, and select **Users & Roles**.
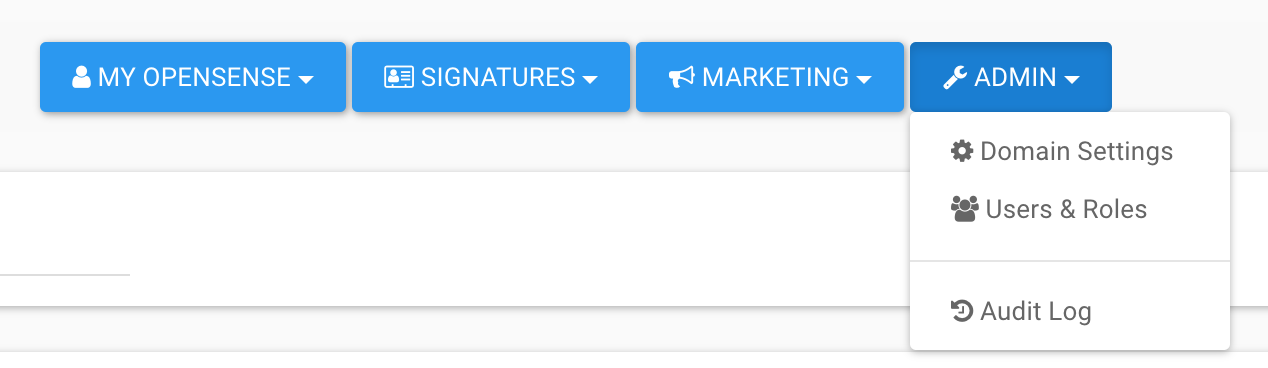
3. Select the blue pencil button
.
4. Every department assigned to the route now gets the selected signature. If a department is assigned to multiple routes, only the highest-priority route is active.

The priority number under the toggle switches shows each route's priority. Drag and drop the signature routes to change their priority. Users who are in more than one department get the highest-priority signature template.
:::tip[Add a catch-all route]
It's best practice to activate a signature route for `allusers`. It works as a catch-all, so every user gets a signature template, even if they aren't assigned to a specific department. To do this, position the "default" template at the bottom of your signature routes.
:::
## Portal access: elevating and toggling permissions
### Granting admin access in Opensense
1. Sign in at [www.opensense.com](https://www.opensense.com/).
2. Open the **Admin** menu, and select **Users & Roles**.

3. Select the blue pencil button  to edit the user.

4. Turn permissions on or off, and select the green check button
to edit the user.

4. Turn permissions on or off, and select the green check button  .

### Types of access in Opensense
By default, new Opensense users get the minimum User permissions. A domain admin must assign permissions to any new user.
.

### Types of access in Opensense
By default, new Opensense users get the minimum User permissions. A domain admin must assign permissions to any new user.
- User
- On by default for anyone who uses an Opensense signature or signs in to Opensense. It gives access to the Opensense menu. You don't need to configure it.
- Signature
- Gives access to the Signatures menu, to manage signatures in Designer Studio, Compliance, the Pusher tool, and more.
- Marketing
- Gives access to the Marketing menu, to manage marketing features like banners.
- Domain Admin
- Gives access to the Admin menu. Domain Admins can assign the permissions above.
## What's next
- [Finding which signature design templates are active](https://help.opensense.com/docs/finding-which-signature-design-templates-are-active)
- [How do I update permissions for the Opensense platform?](https://help.opensense.com/docs/how-do-i-update-permissions-for-the-opensense-platform): roles in the New UI.
For further help, contact Opensense Support at [help@opensense.com](mailto:help@opensense.com).